
One of the most important tasks in car care and maintenance is cleaning the AC. Part of this is knowing how to clean car AC evaporator without removing it. Without car evaporator cleaning, dust, dirt, grime, and grease will collect, reducing the system’s efficiency.
Although seeking service from professionals is an option, not everyone has the time and money to do this every three months. Understanding this, we have put together a detailed guide featuring all the materials that you will need and all the steps to take to clean the evaporator on your own.
In general, you will have to rely on an automotive AC evaporator cleaner and take these seven simple steps:
But there is more to find out! We will uncover many more helpful tips as you read. So, continue until the end of this article.
Taking care of your car’s AC evaporator core is not as difficult as you might think. Read the following sections carefully and follow along!
Gather the following materials:
There are so many different car AC evaporator cleaners available in the market that it is difficult to know which one to get. Indeed, many car owners are overwhelmed and confused by the sheer number of options offered by various brands.
Therefore, to help ease your headache when choosing a car AC evaporator cleaner for your vehicle and air conditioning system, we have curated the key factors you should consider during your selection process.
First, consider how the cleaning solution is packaged and offered. There are two main types that you will be able to find in the market:
Another important factor to consider is the formula. Good options are biodegradable and eco-friendly. They should not contain harsh chemicals that can damage your system. The fragrance is not necessary, but a quality cleaner should be able to get rid of any foul smell in the unit.
You should also not forget to look at the brand and price of the product that you are considering. Well-known brands are always better in that they give you peace of mind and offer warranties. As for price, the most critical thing to keep in mind is: do NOT splurge. You do not have to drain your wallet. There are plenty of standards, well-performing cleaners that are fairly inexpensive.
Invest time and effort into finding a good cleaner for your car AC evaporator core. After all, you will be rewarded with an energy-efficient and cooling experience in all your rides.
If you do not know where to start looking, consider these top-tiered products: Nu-Calgon 4171-75 Evap Foam No Rinse Evaporator Coil Cleaner and JC 5914 Foaming Evaporator Cleaner. Or, check out the official websites of these well-known car care brands: Leak Saver and FJC.
Once you have everything listed above, you are ready to move onto the steps.
To start, you will have to locate the air conditioning system on your vehicle. It should be under the hood and by the firewall, which sections the engine from the passenger seat. From there, pinpoint the evaporator core. More specifically, it will be encased in a plastic box that pops from the firewall. You will find the heater blower motor attached to it.
If there is a resistor unit or blower fan mounted on top or on the side of the heater box, preventing entry to the evaporator core, remove it with the help of a screwdriver and other basic hand tools. Once you have identified the area that you will be working on and have a clear idea of the best access pathway, put on a pair of protective gloves. You can also wear goggles and a face mask if you want.
Now, inspect the evaporator core. If you notice any signs of severe damage, you may have to seek repairs or replacements rather than just a simple cleaning session. In that case, phone professionals. Otherwise, move onto the next step.
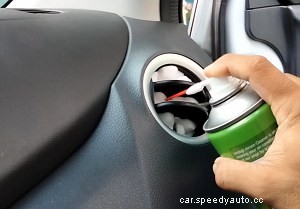
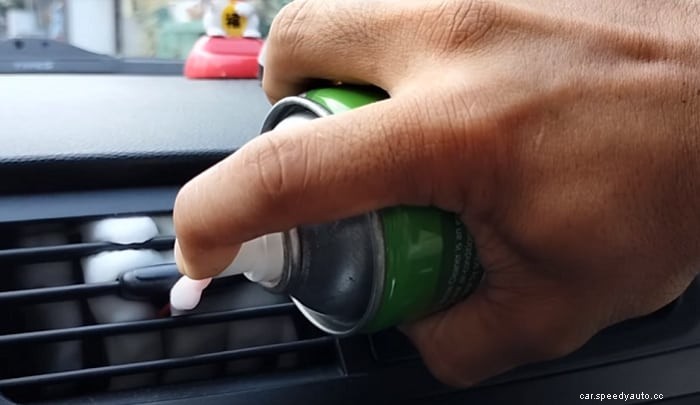
This is where the car evaporator cleaner enters. Use it to spray through the evaporator core. Do this thoroughly, making sure that no parts are left uncovered. Let the cleaner settle for 30 minutes and complete its part in disinfecting.
Most cleaners in the market are foam-based. So, a good indicator for proceeding to the next step is when the foam dissipates and only liquid is left. Said liquid would drain through the openings when it finishes working its magic.
At this point, you can rinse the treated area using water and a soft cloth or rag. It is helpful to use a spray bottle containing water or a garden hose. Make sure that you only make light spritzes. Do not use high-pressure streams.
Otherwise, you will risk over-saturating the unit and damaging the components. Be meticulous and take time to rinse thoroughly. Only move onto after you are sure that there are no residues left.
Next, wipe away any excess moisture. Dab and blot dry the area. For this, use a fresh microfiber cloth or towel. Then, use a handheld, electric dan to blow it dry. However, do not substitute the fan for other heat sources, like a hairdryer. The heat can ruin your system. Remember, better safe than sorry!
The cleaning portion of this procedure is complete. You can re-install any of the parts you have removed earlier, such as the resistor unit and blower fan. In essence, at this step, you are returning the unit to its original set-up.
With that, you have reached the end of this article on how to clean car AC evaporator without removing it. Without a doubt, you are now an expert on cleaning car AC evaporators! To recap, the seven steps that you should take.
Hopefully, it was easy to follow and helpful. If you have cleaned your vehicle’s AC evaporator using our guide, share your experience with us in the comments.
Otherwise, if you have any other thoughts or questions regarding this topic, please do not be afraid to leave a comment. We are always very excited to get comments from readers. Therefore, do not be reluctant!
Additionally, you are welcome to share what you have read with your friends, family, or anyone you think will benefit from this article.
