After reading this step-by-step instruction, you will know how to use an OBD-II scan tool to do testing on your vehicle’s systems.
Your check engine light coming on?
It doesn’t mean you have to stop driving the vehicle completely.
With all the complexities of a vehicle nowadays, it’s good that you have an OBD-II scan tool to help you diagnose and fix the problem, which will also save you a lot of money on repair fees in the long run.
Have you never used one before?
No problem.
We’ve got you covered with all the steps to take to get your car back in shape!
Read more: Mechanic Honest Review of BlueDriver Bluetooth Pro OBDII Scan Tool
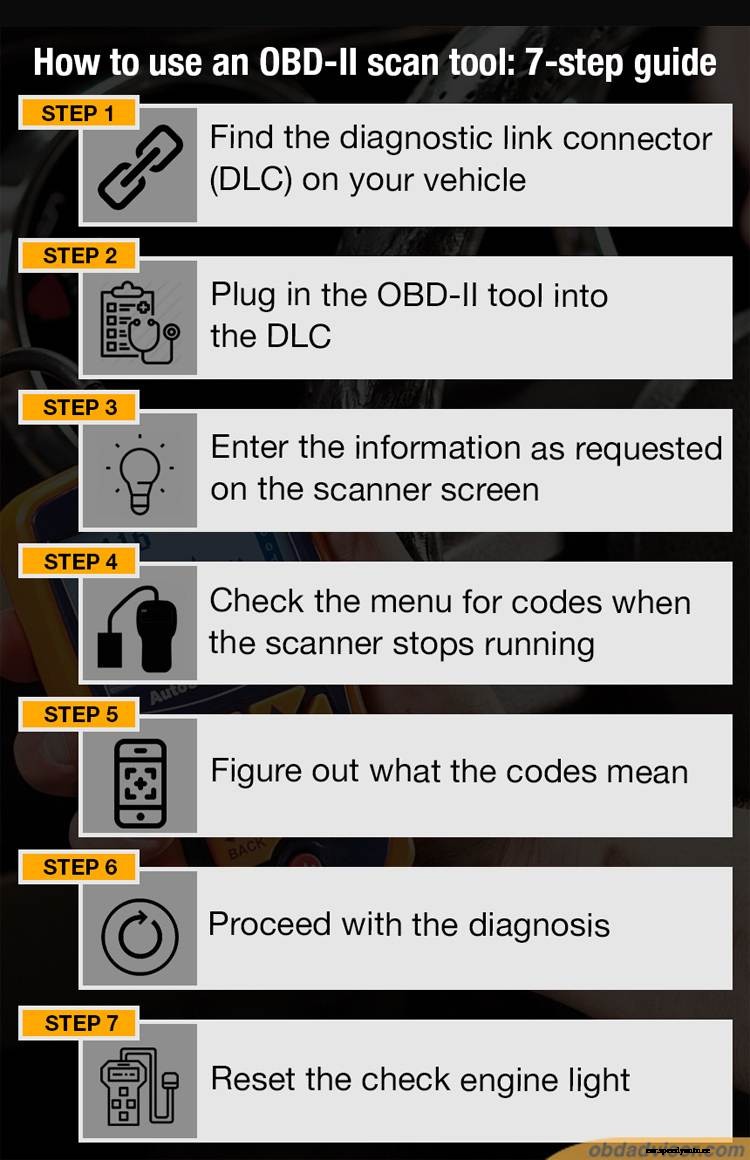
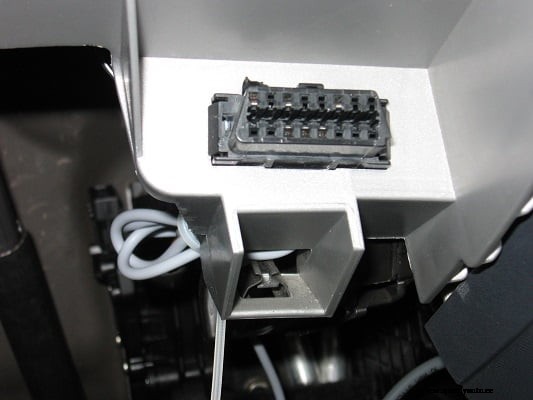
This is usually a triangular-shaped connector that you can find underneath the steering column.
If you can’t find it for some reason, check your owner’s manual or do a quick online search to know what you’re looking for.
When it’s fully inserted, turn the key to the ignition.
But don’t start the engine.
The scan tool will start communicating with the internal computers in your vehicle, and you’ll see some messages on the display screen.
If, for some reason, you don’t see anything on the screen, then make sure it’s fully plugged in.
This might include the Vehicle Identification Number (VIN) and other basic information about your vehicle.
Every OBD-II scan tool differs regarding the amount of information you have to enter.
This step varies among the different types of scanners.
Some will display only the problematic codes, while others will allow you to choose which codes you want to see.
Even though the displays may be different, the codes should pretty much be the same. They will generally start with the letters P, B, C, or U (Powertrain, Body, Chassis, and Undefined).
So you’ll need to check an online code chart to get that information.
You have to be a pretty skilled person when it comes to understanding vehicles to diagnose what’s wrong. The code will tell you what’s wrong, but not necessarily what you need to do to fix the problem.
At this point, you can either take your vehicle to a certified mechanic’s shop to fix the problem or do some research on your own to find out if it’s something you can do yourself.
Sometimes it will just be a fuse that is easy to replace.
Other times it could be a little more serious that requires the expertise of someone who knows what to do exactly.
Once your vehicle is fixed, the check engine light should go away after driving it for a little while. But if you want to get rid of it right away, you can use your OBD-II scan tool to take care of that.
Just go to the main menu and find the check engine light option and press the reset button.
After a few seconds or minutes, the light should be turned off, and you’ll be on your way!
As you can see, it’s not very difficult to use an OBD-II scan tool.
If you follow these simple steps, you won’t have any problem diagnosing the issue with your vehicle.
However, if you have any problems, you can take your vehicle and the scanner to most auto parts stores, and they can help you out with it.
The scan tool itself is a complicated device, but luckily, it’s not hard for the average person to operate!
Bonus: Definite Buying Guide for the Best OBD2 Scanners 2021
