Troubleshooting electrical problems can sometimes seem daunting to beginners. The best way to tackle this is to follow an organized method and test the components one by one. To help you with that, here’s the procedure I’ve learned while working in various automotive dealers explained in details.
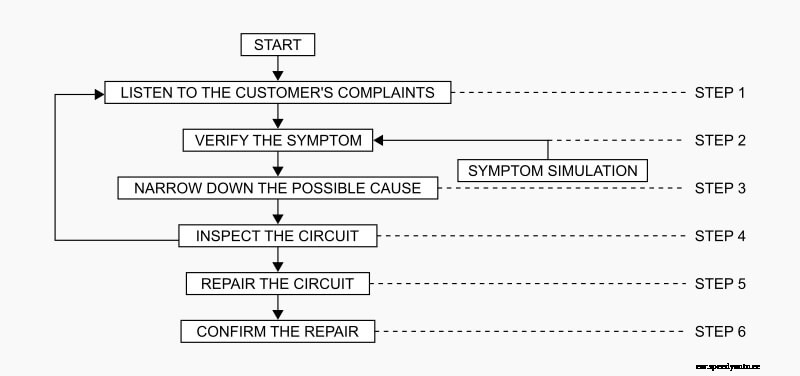
The absolute first thing to do is to get as much information about the conditions and the environment when the incident occurred. Understanding the customer’s complaint is the key here. Ask as many questions as possible and note down the answers. If you are working on your vehicle, be aware of the condition when the problem is happening and try to remember as much information as you can.
The following are key pieces of information required to make a good analysis:
What — Vehicle model, Engine, Year, Transmission and related Systems
When — Date, Time of the Day, Weather Conditions, Frequency
Where — Road Conditions, Altitude and Traffic Situation
How — System Symptoms, Operating Conditions, Service History and Aftermarket Accessories installed on the vehicle
Operate the system and perform a road test if necessary. Verify all the parameters of the incident and ask the customer to come with you while you perform the road test. You can even ask the client to drive the vehicle so you can sit on the passenger side and monitor what is happening and make sure the problem is not related to incorrect operation of the vehicle.
If the customer’s complaint can’t be repeated, jump to “Incident Simulation Tests” section below.
Get the materials and equipment required to perform the troubleshooting including a power supply and the system operation descriptions contained in your vehicle’s repair manual. If you have access to a TSB software, make sure to look if there’s already a technical service bulletin for the same symptoms and problem.
Visually inspect the system and look out for damaged wires and possible faulty components. Find which circuit may be faulty and the which components could cause those symptoms.
If a damaged wire is found, repair the wiring. If not, replace the faulty component.
Confirm the repair and make sure no other problems are lurking in the shadows, especially if the problem was a damaged wire. When a wire is damaged because it’s rubbing against a sharp metal bracket or part, it’s not uncommon to find other damaged wires in the same harness. Perform another road test and make sure everything is fine before delivering the car back to the client.
Every mechanic in the world knows that the symptoms related to the customer’s complaint will often have disappeared once the client arrives at the auto repair shop. Just as with a toothache that doesn’t hurt anymore once you get to the dentist, car problems seem to only happen in the worst situation that is to say, when there’s no mechanic around.
Even though the customer’s comments can give you a good idea where the problem may be coming from, testing a circuit or component can only be done if the problem is present. Therefore, it’s necessary to simulate the conditions and environment when the incident occurred.
The following section contains techniques to help you recreate an intermittent problem so you can test the defective system.
Vibration may cause intermittent electrical problems. This is probably the worst-case scenario and such problems are sometimes really hard to troubleshoot. With time, you’ll gain some experience and you’ll develop your procedures to deal with such problems. In the meantime, following a general procedure like the one that follows is probably your best bet.
Locate the connectors and wiring harness related to the electrical system you are inspecting. Grab the harness with one hand and shake it in all direction and watch if the symptoms appear. Inspect the wires for damages.
Connectors that are exposed to water or moisture can develop a thin film of corrosion on the connector terminals. Always make sure to disconnect suspected connectors as the corrosion may not be visible from the outside. When in doubt, cleaning the connector with electrical connector cleaner might help.
If you suspect the faulty wiring to be located under the hood, the main things to suspect are:
Whenever suspecting a problem located under the hood, always start by inspecting the ground connections. A good ground is the base of all electrical circuit. Inspect the wiring for continuity using the suspected system’s wiring diagram.
Improperly routed or improperly clamped harness can become pinched during the manufacturing or later in the life on the vehicle when aftermarket accessories are installed. Vibrations coming from the vehicle can aggravate a harness or wiring running along with metal brackets.
An incorrectly clamped or loose harness can cause the wiring to be pinched by the seat’s slide guides, resulting in an intermittent problem as the vehicle vibrates. Inspect the wiring for damages near the metal parts of the seats.
If the problem only occurs during hot weather, you’ll want to check for a heat-sensitive condition. To determine if an electrical problem is related to heat, use a heat gun to heat the suspected part while monitoring the electrical system.
If the problem only happens in cold weather or if the customer mentions that the problem goes away after the car warms up, it may be related to water freezing somewhere in the electrical system.
The best method to check for this is to have for the client leave his car for the night if the expected weather is cold enough to create the incident. Let the car outside and inspect it again the next morning. If you are courageous enough, you can even try to perform the preliminary checkup and start the troubleshooting process outside to keep the car cold for long enough for you to identify where the problem is coming from.
Testing electrical circuits is not that hard if it’s approached using a logical and organized method. To make the process as simple as possible, make sure you have all the information on the system to be tested before you begin. Correctly understanding the system operation is also critical to reach a correct diagnosis.
Whenever testing an electrical circuit, having access to the wiring diagram can make a world of difference. Electrical systems are more complicated now than ever and all cars are built differently. Trying to diagnose an electrical problem without a wiring diagram is basically like trying to find a needle in a haystack. You can always get away with sketching a rough schematic of the system on a piece of paper but unless it’s a really simple circuit like back-up lights or the windshield washer system, working without a wiring diagram will make your job a lot more complicated.
A continuity test is used to find if a circuit is open. Whenever performing a continuity test, set your multimeter to the resistance setting and make sure to always start with your multimeter set at the highest resistance level.
When testing a circuit for continuity, always remember to disconnect all the connectors related to that section. To measure resistance, a multimeter sends a 1V signal through one probe and monitors the voltage coming back on the other side. If any electronic component is still connected to the circuit, it could be damaged beyond repair.
As opposed to measuring resistance, measuring voltage doesn’t risk damaging expensive electronic components. Consequently, you can only disconnect the connectors you are currently testing.
There are two types of electrical shorts — short circuits and short to ground conditions. Both conditions can be tested in the same way but will lead to different consequences. In both cases, when a short happens, the fuse will blow right away.
Grounds are often exposed to dirt, snow, and rain especially ground connections located under the hood. Once rust can build upon a ground connection, it will lead to unwanted resistance. The added resistance can alter how a circuit works and send signals out of the normal operating threshold, leading to DTCs being recorded in control modules.
When inspecting a ground connection, always follow this procedure:
