Each year, billions of dollars are spent on next level car cleaning services and gimmicky detailing supplies, and do you know what? A lot of it is either complete crap, or entirely unnecessary.
From weekly trips down to the scratch-inducing automatic car wash and infomercial-backed shampoo supplies, to paying professional detailers to make house calls, it’s all up for grabs, and by Zeus’ beard do we buy into it.
There are an endless array of reasons for buying into quick fix detailing solutions, or opting-out entirely by contracting a professional auto detailer. Maintaining a clean car is an expensive, time-consuming, and painstakingly tedious process, with cut corners typically resulting in subpar results, or worse yet, damaged surfaces.
But like any other routine automotive maintenance project, there are some steps that can be taken to reduce car cleaning mistakes, all while saving a sizable sum of time, money, energy, and expletives.
So if you’re a do-it-yourself guy or gal, keep on scrolling, because we tossed everything you need to know about cleaning a car’s exterior into today’s bucket of suds.
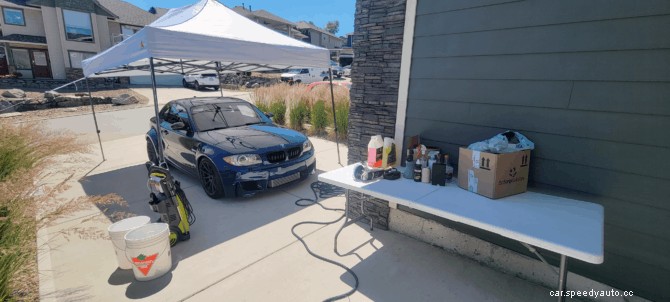
The first thing you need to decide on, is where you plan on cleaning the vehicle. While an even surface, such as a driveway may seem ideal, be sure to take into account water hose location, and whether or not ample drainage is present. You don’t want to create a quagmire in your driveway, or water your garden with maintenance car shampoo run-off.
Another thing to consider is the significance of shade, and the importance of having ample elbow room. Direct sunlight causes water spots and other sudsy issues, while a lack of space just flat-out sucks.
Cleaning a car is so much easier when you’re not tripping over your own supplies, so having a product basket that can be easily moved around is a must.
While you’re at it, make sure your garden hose or pressure washer line are completely uncoiled, and that there are no H2O supply issues. There’s nothing worse than hitting a car’s body panels with a soft cloth and some sudsy water, only to discover that you are unable to rinse it all away afterward.
The first area you’ll be cleaning will be your car’s wheels and tires. Everything from brake dust and road grime, to de-icing chemicals and roadkill entrails are forever quick to grab ahold of your vehicle’s rollers and the rubber that wraps around them. So getting all four of these components cleaned first will prevent your freshly cleaned fenders and rocker panels from getting hit with contamination.
One key thing to remember here, is that you should always use a separate set of cleaning supplies for washing your wheels and the car. All you’ll need is a separate wash bucket, as well as a wheel-and-tire brush or wash mitt, and either a good car shampoo, or a dedicated wheel cleaning spray.
Some things you’ll want to make sure are prepped and ready to rock include:
A few additional car cleaning goodies you might want to consider obtaining are:
Supplies stocked and ready to rock, it’s finally time to get to kicking ass. But wait… Before getting started on the cleaning process, you’ll need to keep the following car cleaning rules in mind.
Feel free to print them out for framing in your garage, have them laminated and placed in your glovebox, or get a burly tattoo artist by the name of Clive to inscribe them upside down on your abdomen.
When it comes to washing a car, everyone has their own preferred method for removing dirt, debris, bird shit, acid rain, bug guts, tree sap, microplastic pollution, and other unpleasantries.
That said, the following steps tend to be the most universally accepted and effective forms of exterior car cleaning.
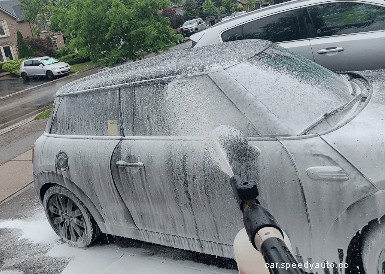
Before you apply soap to any portion of a vehicle, it’s important to give the exterior a pre-wash. This will remove any light debris from the vehicle, and provide additional lubrication, which reduces the risk of scratches and swirl marks.
Pre-wash complete, hit those rollers with your tire and wheel cleaning supplies and pressurized water… LOTS of water, and then implement the following steps.
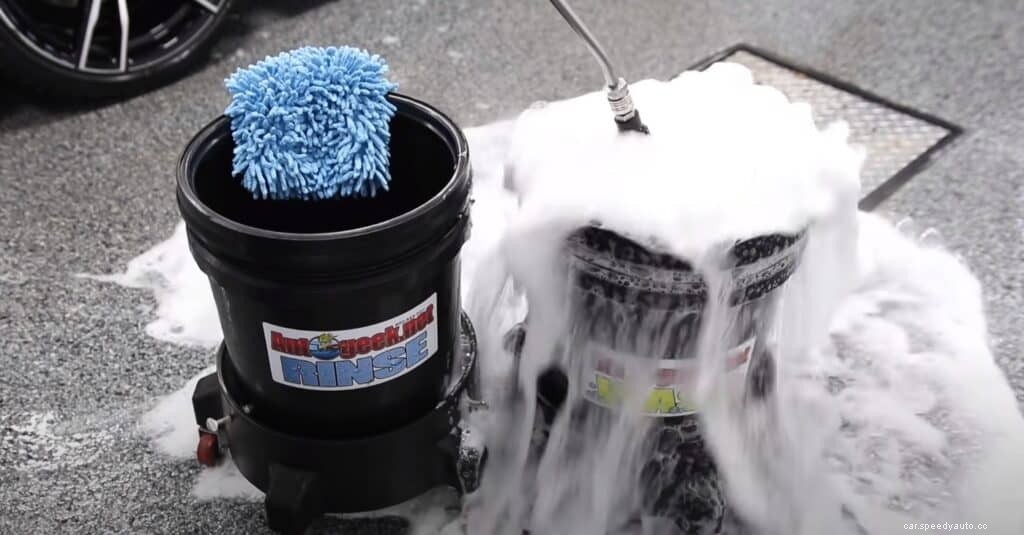
After you’ve washed your wheels, spray the entire vehicle with fresh water again, and get your duo of scrubbing buckets ready.
For those of you who are unfamiliar with what the two-bucket car wash system entails, here is an abbreviated outline of how to implement this simple, yet crucial cleaning technique.
Once you’ve completely washed the vehicle, and rinsed away any stubborn soap residue, you will begin the drying process.
When drying an automobile, always use a scratch-free microfiber drying material, and go side-to-side or up-and-down to negate the creation of swirl marks.
For more on these steps, and other in-depth car cleaning tips and advice, be sure to check-out AvalonKing’s car detailing guide for beginners.

Unfortunately there are some things that routine car cleaning will not negate. Clear coat oxidation, surface scratches, peeling paint, and rock chips are but a few of the many harmful side-effects of daily driving that a wash and dry will not correct.
Knowing how to amend these issues on one’s own, as well as when to hand the job over to a pro are both equally important.
So clean carefully, drive safely, and hit us up if you have any questions, comments, or concerns. Your friendly AvalonKing customer service rep is forever happy to help steer you in the right car detailing direction.
