Once upon a time, the majority of the cars on the road were virtually indestructible behemoths of steel and iron. Over the last several decades, though, more and more manufacturers started to replace vehicle parts with plastic alternatives. While this reduces weight and eliminates corrosion, those plastic parts don’t tend to hold up as well as their steel counterparts. Plastic gas tanks are one of those parts that can crack and break down over time. But you don’t necessarily have to fork over a bundle of cash to replace it. In this article, we’ll discuss some simple ways to fix a crack in a plastic gas tank.
Before we jump into possible fixes for a cracked gas tank, it’s important to take some safety precautions first.
The bottom line is that you’ll be working with a part that is meant to store fuel. That presents a pretty serious fire hazard.
First and foremost, take steps to remove all the fuel from your tank before you start in with the repairs.
Some fuel tanks actually have a small drain plug that can be removed to drain fuel. If your tank has a plug, this would obviously be the easiest method for getting rid of the fuel. If your tank doesn’t have a drain plug, you’re going to need to siphon the fuel out.
Despite what you’ve seen in the movies, the best way to siphon fuel does not involve sticking a hose into your tank and sucking the fuel out with your mouth. Instead, head to your local parts store and purchase a cheap and easy to use pump kit.
Most kits come with a couple of hoses and two inlets on the pump itself. One hose connects to one side of the pump, and this hose is inserted into your fuel tank. The other hose usually connects to the bottom of the pump and is inserted into a spare fuel can.
Simply prime the pump a few times with the handle and when the fuel starts flowing you can leave it sit—gravity will take care of the rest.
Even if you’ve managed to pump out the majority of fuel from your tank, you won’t likely be able to get every last drop, and you’ll certainly have fumes remaining in the tank.
So, don’t use any tools or methods that will create a spark while you’re working on your repair. Luckily, none of our suggested methods involve flames or sparks.
In most cases, replacing the fuel tank in your vehicle will cost at least a thousand dollars, so being able to fix a crack in plastic tanks is a huge money saver.
What follows are three methods of fixing cracks in plastic tanks. Each method is relatively easy and doesn’t require any expensive tools. Here’s a closer look at each method.
When most people think about using a soldering gun, they likely picture working with electronic components like wires and circuit boards.
However, a soldering gun can also be used to repair a crack in a plastic fuel tank.
Start by draining your fuel using one of the methods mentioned above. In addition to draining the fuel, pour a little soap and water on the inside, and thoroughly scrub the outside of the tank where you’ll be doing the repair. You’ll want to give your tank plenty of time to dry out completely.
The next step is to find a piece of plastic that you’ll use as a “patch” for the damaged area. You’ll need to get a plastic that’s made from high-density polyethylene so it’s chemically resistant. Our advice is to pick up an actual plastic fuel can like you’d use for fueling up your lawn mower. Cut a piece out of the can that’s slightly larger than the area you’ll be repairing on your car’s tank.
You’re also going to need a soldering gun for this repair. Plug it in and let it warm up. When it’s ready, drag the tip around the edge of the crack in your fuel tank. You obviously don’t want to melt all the way through the plastic, but what you’re shooting for here is to create a groove all the way around the crack. Next, run the gun back and forth across this groove so that it creates a little river of melted plastic. While the surface is still hot and pliable, stick your patch over the area and hold it until it stays in place.
Next, use your soldering gun to blend the edges of your patch with the tank itself until you’ve gone all the way around the repair area and sealed everything up. When the patch is dry and completely cooled down, use a heavy-duty epoxy glue to cover the entire repair area.
If you want to take the repair a step further you can sand the area down and spray paint it to match the rest of your tank.
Using just epoxy to fix a crack in your gas tank is definitely the easiest method. However, it should only be used for smaller damages, like punctures. Also, this method usually isn’t a permanent one, and there’s a chance that you’ll find your tank leaking again after time.
That said, it’s a good and inexpensive method to fix a cracked fuel tank if you happen to be on a road trip. It will definitely get you home until you can perform a more permanent repair.
Start your repair by draining out all of the fuel from your tank and let it dry out completely.
Next, you need to actually locate the crack or puncture in your tank. If it’s especially small, it might help to mark the area around the damage with a colored marker so you can easily find it again. When you’ve located the damage, use some coarse sandpaper to rough up the area around the crack or hole.
At this point, you want to thoroughly clean the area you’ll be repairing. The best way to do this is to soak a rag with some denatured alcohol and wipe the plastic area with the damage.
To conduct the repair, you’re going to need some 2-part epoxy and a fiberglass patch that’s large enough to cover the area you’ll be repairing. You find these patches at any auto parts store.
As for the epoxy, there are countless products on the market, but in our opinion, you really can’t go wrong with the Gorilla Glue 2-Part Epoxy. It’s very easy to use, thanks to its double syringe, and it holds like concrete. Plus, it dries clear so it’s ideal for repairs that you don’t want to draw a lot of attention to.
Follow the directions on the 2-part epoxy and mix it up. Then, apply the epoxy to the area surrounding the damage on your gas tank. Press your fiberglass patch over the damaged area and make sure it sticks to the epoxy you laid down. Next, add more epoxy on top of the fiberglass patch and press down so that it’s completely soaked with the epoxy.
Allow the epoxy to dry completely, at which point you can sand it and paint it if you choose.
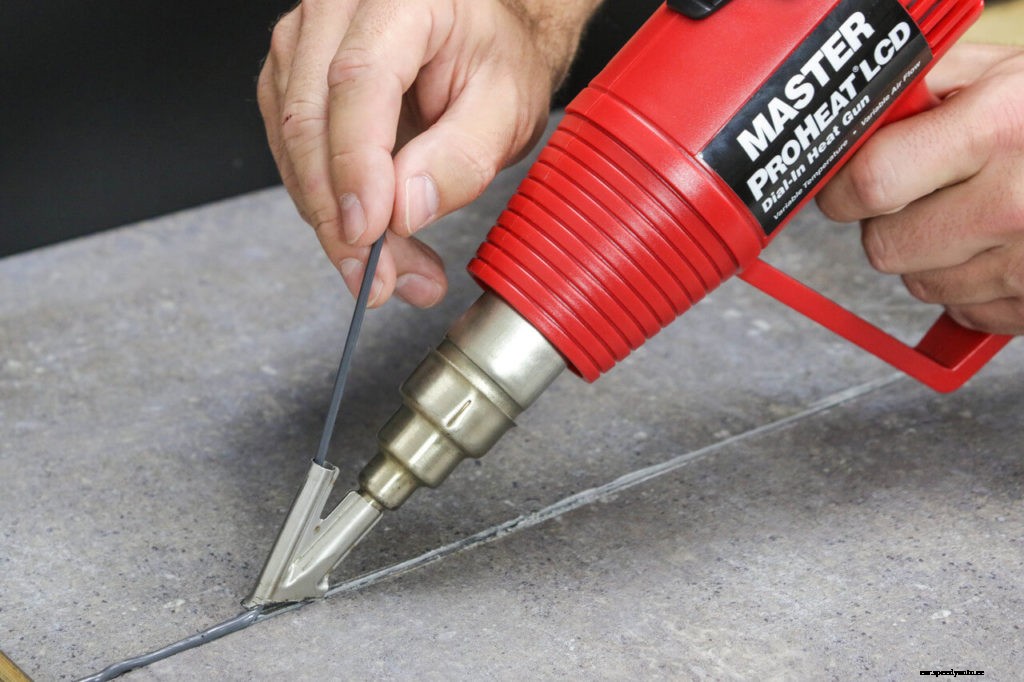
Wait, what? Welding plastic?
You read that right. There’s a special tool that actually allows you to “weld” plastic. Fixing a cracked plastic gas tank with a welder is the most complicated method, but it’s also the most permanent and effective method.
There are plenty of plastic welders on the market and they run the gauntlet in terms of prices. However, unless you plan to be doing a lot of plastic welding, we suggest that you go with the cheap plastic welder from Harbor Freight.
The 80-watt version will still reach a maximum temperature of 525 degrees (more than enough to melt plastic gas tanks) and the kit comes with a ton of welding rods.
As usual, you want to drain the fuel completely from your tank. You’re using a welding iron here, so it’s extremely important that your fuel tank is dry before you get started.
It takes a bit of practice to get used to welding plastic, so while your fuel tank is drying out, we recommend you make some practice runs on scrap plastic.
Plug your welding iron in and allow it to heat up. This usually takes about 5 minutes. Then, hold the iron in one hand and one of the plastic welding rods in the other.
Press the tip of the rod onto your practice piece and use the iron to melt the plastic. You’ll apply stead pressure with the rod as you melt the tip onto your scrap plastic.
Move the iron back and forth and in circular motions so you get a feel for how the plastic melts and the size of the area you’ll be able to cover. Once you’re comfortable, it’s time to move on to repairing your gas tank.
Locate the crack or hole in your tank, and using the same method as your practice piece, start working the rod and iron over the damaged area.
Pass back and forth over the crack as much as needed to completely fill the gap with new plastic. It may take a while and if the crack is large, you’ll likely need to go through multiple welding rods.
When you’re confident you’ve completely filled the damage, allow the melted plastic to cool and harden. Then, sand the area down a bit and you should be able to tell if you left any pinholes in your repair job.
If you need to touch any areas up, simply plug your welding iron back in and grab another welding rod. Perform a final sanding to clean everything up and paint your repair area if you wish.
A damaged fuel tank can be an extremely costly repair if the part needs to be completely replaced.
However, if the damage isn’t severe, cracks and holes can easily be repaired using one of our 3 methods above.
Just remember to be cautious when working around fuel and fumes. And if the damage is too large, bite the bullet and get a replacement tank.
For more tips on keeping your vehicle on the road, check out our maintenance article.
