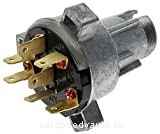
The ignition switch, as the name implies, controls the ignition system of the engine. It activates once the key is turned in the ignition lock, and the correct chip key FOB is present. However, it’s not uncommon for the ignition switch to fail, especially once the mileage clock enters the six-digit range.
Multimeter tool is an essential part of any DIY mechanic’s kit. It allows you to quickly test the state of electrical connections and identify possible issues.
The ignition switch is just one part of the ignition system, so in this guide, I’ll cover how to test all of the components and identify the cause of the electrical problem. A basic multimeter will get the job done, but having a larger variety of test leads can make your job easier. I’ll leave a few options in the table below, and you can decide which one fits your needs and budget.
| Title | Price | Buy | |
|---|---|---|---|
 Top
Top
Top
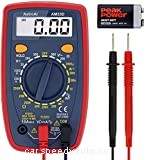
Top | AstroAI Multimeter 2000 Counts Digital Multimeter with DC AC Voltmeter and Ohm Volt Amp Tester ; Measures Voltage, Current, Resistance; Tests Live Wire, Continuity | ||
 Top
Top
Top
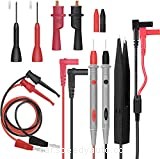
Top | Electrical Multimeter Test Leads Set with Alligator Clips Test Hook Test Probes Lead Professional Kit 1000V 10A CAT.II | ||
 Top
Top
Top
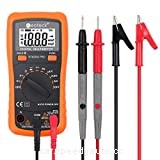
Top | Neoteck Auto Ranging Digital Multimeter AC/DC Voltage Current Ohm Capacitance Frequency Diode Transistor Audible Continuity, Multi Tester with Backlit LCD | ||
 Top
Top
Top
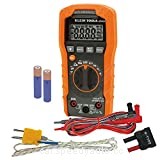
Top | Klein Tools Digital Multimeter, Auto-Ranging, 600V MM400 , Orange , Auto Ranging/Temperature, Capacitance, frequency |
To test the ignition switch, first, we need to gain access to it, which involves removing the bottom steering column shroud. The exact process varies between vehicles, but there are usually a series of clamps and screws holding it in place.
With the shroud off, we can now insert the key into the lock. Double-check that the vehicle is in park gear (neutral gear for the manual gearbox) and that the parking brake is engaged.
Connect the ground alligator clip (black wire) to the multimeter and attach it to the chassis bolt that keeps the driver’s door in place. The live (red) wire can also be an alligator clip, but the basic probing lead will work better. Set the multimeter to 20 volts DC – it’s represented by a straight line and three dots beneath it, positioned left of a capital V.
On the opposite side of the ignition key, you’ll find a cylindrical housing with wires connected to it. Touch each metal connector with the testing probe while turning the ignition and watch for readings on the multimeter. Alternatively, you could use a test lamp and see whether it lights up. If the multimeter doesn’t read any voltage, you need to replace the ignition switch.
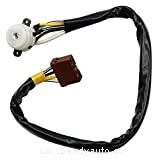
The complexity of the job depends on how the ignition system is configured in your vehicle. In some cars, it’s as simple as unscrewing the electrical side of the ignition lock and unplugging a power cable. However, most vehicles will require you to remove the cylinder lock as well, and even the entire ignition housing.
| Title | Price | Buy | |
|---|---|---|---|
 Top
Top
Top
Top | CRAFTSMAN Screwdriver Set, Assorted, 8-Piece (CMHT65075) | ||
 Top
Top
Top
Top | ACDelco Professional D1415B Ignition Switch | ||
 Top
Top
Top
Top | Beck Arnley 201-1805 Ignition Starter Switch | ||
 Top
Top
Top
Top | Beck Arnley 201-1973 Ignition Lock and Cylinder Assembly Switch |
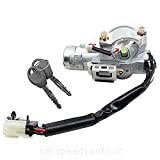
Removing the cylinder lock would require you to change your ignition key, but if your current key and tumblers aren’t worn out, there’s no need to do it. Use a thin screwdriver to press into a hole in the ignition assembly, near the cylinder lock. Put the original key into the lock, then pull the entire cylinder out with the key. Repeat the process for the new assembly, and just insert the original cylinder by pushing it in.
Testing the ignition switch is not a bad idea if you’re already suspecting it to be the cause of your problems, but there are other components in the ignition system that are worth checking out. In this section, I’ll show you how to inspect other parts of the system with a multimeter and a couple of other tools.
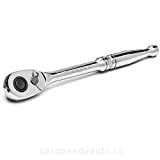
Testing the spark plugs is the most time-consuming step, but given the likelihood of the spark plug going bad, it should be one of the first things to check. There are two ways to check spark plugs, but the common step is to unscrew them from the engine block. To do that, you’ll need a ratchet arm and a special spark plug socket.
| Title | Price | Buy | |
|---|---|---|---|
 Top
Top
Top
Top | Energizer Jumper Cables for Car Battery, Heavy Duty Automotive Booster Cables for Jump Starting Dead or Weak Batteries with Carrying Bag Included (20-Feet (4-Gauge) | ||
 Top
Top
Top
Top | SATA 3/8-Inch Drive Quick-Release 72-Tooth Ratchet with an Teardrop Head, Full-Polished Chrome Finish - ST12971U | ||
 Top
Top
Top
Top | LEXIVON 5/8" Swivel Magnetic Spark Plug Socket, 3/8" Drive x 10" Total Length | Enhanced Magnetic Design With Thin Wall Socket, Cr-v Steel (LX-122) |
To remove the spark plug, disconnect the spark plug wires and use the socket to unscrew it. Once it’s out, there are two ways you can check if it’s working. One is to put it back into the wire, attach a jumper cable to the ground and the thread of the spark plug, and crank the engine. If you see the sparks coming out of the tip of the spark plug, it means that it’s working.
I prefer the second method as it’s safer and easier to do. Set your multimeter to 20k ohm (Ω) or whatever the setting is in tens of thousands and touch the top of the spark plug with one probe, and the small tip underneath the hook at the bottom of the hook with the other probe. There is a rod running through the center of the spark plug, and by touching those two points, you’re closing the circuit.
The reading you get will be in thousands of ohms, but you’ll have to check the specification of the spark plug manufacturer, or the owner’s guide to see what the correct resistance range is.
If the spark plug has the correct resistance, set the multimeter to the highest ohm setting, keep one probe on the tip of the spark plug, and touch across the side of the spark plug with the other probe. You should not get any reading while doing this – otherwise, it indicates that the spark plug has gone bad.
Whether there are one or several faulty spark plugs, you should replace the entire set for consistency. The number of spark plugs you need usually correlates with the number of cylinders of the engine, but some engines use two sparks per cylinder, so keep that in mind.
To test the spark plug wires, set the multimeter to the lowest ohm setting, and connect the probes to the inside of the wires. If there’s no resistance, you’ll have to change the spark plug wires for the engine to run optimally. However, make sure you’re properly measuring the resistance and not accidentally connecting the probes in the wrong place.
Expose two towers of the ignition coil and attach the alligator clips to it. That’ll make it easier to get a reading on the multimeter, which should be set to ohms. Compare the reading to your service manual to determine whether the ignition coil is within the range and hasn’t gone bad.
To check the crankshaft sensor, you’ll need another person to help you out and check the owner’s manual to see what kind of a reading you should expect. Set the multimeter to a 200 volt AC setting, disconnect the crankshaft position sensor, and insert the probes into the power jack. Ask the other person to crank the engine while you’re reading the multimeter.
Replacing a bad crankshaft position sensor isn’t difficult, so if you’re certain that the readings aren’t correct, you can replace it yourself by simply pulling the old one out and pushing the new one in place.
Locating the power supply connector can be a bit difficult, but it’s usually located behind the ignition coil. Disconnect the cable and turn the ignition key to the On position. Set the multimeter to 20 volts DC, ground the black wire while probing the power supply with the other. If you get a voltage reading, it means that the ignition is receiving power.
Before testing the ignition switch with the multimeter, you may experience a number of problems: failure to start the car when the key is turned or problems with turning the key at all, stalling, flickering dashboard lights, and no noise coming from the engine starter.
You might have to buy an ignition switch packaged with the cylinder lock or even the whole ignition assembly, but that doesn’t mean you have to switch keys. The original key and tumbler can be easily transferred into the new assembly and allow you to continue using your key.
I would advise you to at least attempt to replace the ignition switch yourself, as it’s not a very complicated job. You need to be careful not to break the steering column shroud, but other than that, the process involves unscrewing a few screws and bolts and putting the new parts in their place. I’ve explained how to replace the ignition switch in this very article, so scroll up if you’d like to learn more.
The exact cost depends on how the ignition switch is assembled. An ignition switch without the cable or cylinder lock can go for as little as $20. If it comes with the ignition cable, it’s going to cost roughly $40, while the assembly with the cylinder lock, new keys, and the housing can reach $100.
Yes, your vehicle has a dedicated fuse for the ignition switch. In the owner’s manual, you’ll find a diagram that explains what each of the fuses is connected to.
The average cost of labor to replace the ignition switch is around $60-100, while the parts range from $20-100, so you can expect to pay around $150 in the shop, or $50 if you do the job yourself.
The multimeter is an extremely useful tool in diagnosing power-related problems, so I would strongly recommend picking one up, even if it’s the most basic model. I hope that reading this guide has helped you test the ignition switch of your car, as well as show you how to inspect other components of the ignition system!
Check out other VehicleFreak’s related articles:
How To Remove The Ignition Lock Cylinder Without a Key
How To Test Transfer Case Shift Motor
How To Test A Fuel Pump Without A Pressure Gauge
